Westley-Davis Academy Online
Virtual High School
Westley-Davis Academy Online Computer Tutorial
![]()
Introduction to Computers
Hardware--What the Computer is About
The hardware are the parts of computer itself including the Central Processing Unit (CPU) and related microchips and micro-circuitry, keyboards, monitors, case and drives (floppy, hard, CD, DVD, optical, tape, etc...). Other extra parts called peripheral components or devices include mouse, printers, modems, scanners, digital cameras and cards (sound, color, video) etc... Together they are often referred to as a personal computers or PCs.
Central Processing Unit (CPU) -
Though the term relates to a specific chip or the processor a
CPU's performance is determined by the the rest of the computers
circuitry and chips.
Currently the Pentium chip or processor, made by Intel, is the most common CPU though there are many other companies that produce processors for personal computers. One example is the CPU made by intel which is used in most dell computers.
With faster processors the clock speed becomes
more important. Compared to some of the first computers which operated
at below 900 megahertz (MHz) the Pentium chips began at 75 MHz in
the late 1990's. As of mid 2003 speeds now exceed 2.1
gigahertz (GHz) (check your local computer store for the latest
speed). It depends on the circuit board that the chip is housed
in, or the motherboard, as to whether you are able to upgrades to
a faster chip. The motherboard contains the circuitry and connections
that allow the various component to communicate with each other.
Though there were many computers using many different processors previous to this I call the 80286 processor the advent of home computers as these were the processors that made computers available for the average person. Using a processor before the 486 involves learning a proprietary system and software. Most new software is being developed for the newest and fastest processors so it can be difficult to use an older computer system.
Keyboard - The keyboard is used to type
information into the computer or input information. There are
many different keyboard layouts and sizes with the most common for Latin
based languages being the QWERTY layout (named for the first 6 keys).
The standard keyboard has 101 keys. Notebooks have embedded keys
accessible by special keys or by pressing key combinations (CTRL
or Command and P for example). Ergonomically designed keyboards
are designed to make typing easier.
Some of the keys have a special use. There are referred to as command keys. The 3 most common are the Control or CTRL, Alternate or Alt and the Shift keys though there can be more (the Windows key for example or the Command key). Each key on a standard keyboard has one or two characters. Press the key to get the lower character and hold Shift to get the upper.
Disk Drives - All disks need a
drive to get information off - or read - and put information
on the disk - or write. Each drive is designed for a specific
type of disk whether it is a CD, CDRW, DVD, DVDRW, hard disk or floppy.
Often the term 'disk' and 'drive' are used to describe the same thing
but it helps to understand that the disk is the storage device
which contains computer files - or software - and the drive is
the mechanism that runs the disk.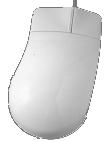
Mouse - Most modern computers today are run using a mouse controlled pointer. Generally if the mouse has two buttons the left one is used to select objects and text and the right one is used to access menus. If the mouse has one button (Mac for instance) it controls all the activity and a mouse with a third buttons can be used by specific software programs.
One type of mouse has a round ball under the bottom of the mouse that
rolls and turns two wheels which control the direction of the pointer on
the screen. Another type of mouse uses an optical system to track the
movement of the mouse.
Note: It is important to clean the mouse periodically, particularly if it becomes sluggish. A ball type mouse has a small circular panel that can be opened, allowing you to remove the ball. Lint can be remove carefully with a tooth pick or tweezers and the ball can be washed with mild detergent. A build up will accumulate on the small wheels in the mouse. Use a small instrument or finger nail to scrap it off taking care not to scratch the wheels. Track balls can be cleaned much like a mouse and touch-pad can be wiped with a clean, damp cloth. An optical mouse can accumulate material from the surface that it is in contact with which can be removed with a finger nail or small instrument.
Monitors - The monitor shows information on the screen when you type. This is called outputting information. When the computer needs more information it will display a message on the screen, usually through a dialog box. Monitors come in many types and sizes from the simple monochrome (one color) screen to full color screens.
Most desktop computers use a monitor with a cathode tube and
most notebooks use a liquid crystal display (LCD) monitor.
To get the full benefit of today's software with full color graphics and animation, computers need a color monitor with a display or graphics card.
Printers - The printer takes the
information on your screen and transfers it to paper or a hard copy.
There are many different types of printers with various levels of
quality. The three basic types of printer are; dot matrix,
inkjet, and laser.
- Dot matrix printers work like a typewriter transferring ink from a ribbon to paper with a series or 'matrix' of tiny pins.
- Ink jet printers work like dot matrix printers but fires a stream of ink from a cartridge directly onto the paper.
- Laser printers use the same technology as a photocopier using heat to transfer toner onto paper.
Modem - A modem is used to translate information transferred through telephone lines or cable.
The term stands for modulate and demodulate which changes the signal from digital, which computers use, to analog, which telephones use and then back again. A high speed connection also requires a modem but because the information is transferred digitally it isn't required to change the signal from digital to analog but is used to create the connection between your computer and the computer you are connecting with.
Modems are measured by the speed that the information is transferred. The measuring tool is called the baud rate. Originally modems worked at speeds below 2400 baud but today analog speeds of 56,000 are common. Cable, wireless or digital subscriber lines (DSL) modems can transfer information much faster with rates of 300,000 baud and up.
Modems also use Error Correction which corrects for
transmission errors by constantly checking whether the information was
received properly or not and Compression which allows for faster
data transfer rates. Information is transferred in packets. Each
packet is checked for errors and is re-sent if there is an error.
Anyone who has used the Internet has noticed that at times the information travels at different speeds. Depending on the amount of information that is being transferred the information will arrive it's destination at different times. The amount of information that can travel through a line is limited. This limit is called bandwidth.
There are many more variables involved in communication technology using computers, much of which is covered in the section on the Internet.
Scanners- Scanners allow you to transfer pictures and photographs to your computer. A scanner 'scans' the image from the top to the bottom, one line at a time and transfers it to the computer as a series of bits or a bitmap. You can then take that image and use it in a paint program, send it out as a fax or print it. With optional Optical Character Recognition (OCR) software you can convert printed documents such as newspaper articles to text that can be used in your word processor. Most scanners use TWAIN software that makes the scanner accessable by other software applications.
Digital cameras allow you to take digital photographs. The images are stored on a memory chip or disk that can be transferred to your computer. Some cameras can also capture sound and video.
Case - The case houses the microchips and circuitry that run the computer. Desktop models usually sit under the monitor and tower models beside. They come in many sizes, including desktop, mini, midi, and full tower. There is usually room inside to expand or add components at a later time. By removing the cover off the case you will may find plate covered, empty slots that allow you to add cards. There are various types of slots including IDE, ASI, USB, PCI and Firewire slots.
Notebook computers may have room to expand depending on the type of computer. Most Notebooks also have connections or ports that allows expansion or connection to exterior, peripheral devices such as monitor, portable hard-drives or other devices.
Cards - Cards are components added to computers to increase their capability. When adding a peripheral device make sure that your computer has a slot of the type needed by the device.
Sound cards allow computers to produce sound like music and voice. The older sound cards were 8 bit then 16 bit then 32 bit. Though human ear can't distinguish the fine difference between sounds produced by the more powerful sound card they allow for more complex music and music production.
Color cards allow computers to produce color (with a color monitor of course). The first color cards were 2 bit which produced 4 colors [CGA]. It was amazing what could be done with those 4 colors. Next came 4 bit allowing for 16 [EGA and VGA ] colors Then came 16 bit allowing for 1064 colors and then 24 bit which allows for almost 17 million colors and now 32 bit is standard allowing monitors to display almost a billion separate colors.
Video cards allow computers to display video and animation. Some video cards allow computers to display television as well as capture frames from video. A video card with a digital video camera allows computers users to produce live video. A high speed or network connection is needed for effective video transmission.
Cables connect internal components to the Motherboard, which is a board with series of electronic path ways and connections allowing the CPU to communicate with the other components of the computer.
Memory - Memory can be very confusing but is usually one of the easiest pieces of hardware to add to your computer. It is common to confuse chip memory with disk storage. An example of the difference between memory and storage would be the difference between a table where the actual work is done (memory) and and a filing cabinet where the finished product is stored (disk). To add a bit more confusion, the computer's hard disk can be used as temporary memory when the program needs more than the chips can provide.
Random Access Memory or RAM is the memory that the computer uses to temporarily store the information as it is being processed. The more information being processed the more RAM the computer needs.
One of the first home computers used 512 kilobytes of RAM memory (Commodore 512). Today's modern computers need a minimum of 512 MB (recommended 256 or512 MB) to run Windows or OS 10 with modern software.
RAM memory chips come in many different sizes and speeds and can usually be expanded. Older computers came with 512 KB of memory which could be expanded to a maximum of 640 KB. In most modern computers the memory can be expand by adding or replacing the memory chips depending on the processor you have and the type of memory your computer uses. Memory chips range in size from 256MB to1 GIG B. As computer technology changes the type of memory changes as well making old memory chips obsolete. Check your computer manual to find out what kind of memory your computer uses before purchasing new memory chips.
Software
Navigating Microsoft Word: An Introduction
Lesson One: Microsoft Word for Windows
This tutorial teaches Microsoft Word basics. Although knowledge of how to navigate in a Windows environment is helpful, this tutorial was created for the computer novice. To begin, open Microsoft Word. The following screen will appear.
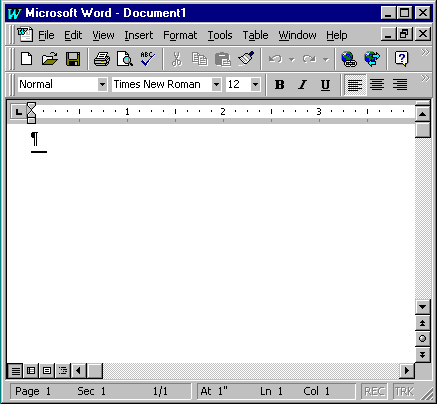
![]()
This lesson will familiarize you with the Microsoft Word screen. We will start with the Title bar, which is located at the very top of the screen. On the Title bar, Microsoft Word displays the name of the document you are currently using. At the top of your screen, you should see "Microsoft Word - Document1" or a similar name.
![]()
The Menu bar is directly below the Title bar and it displays the menu. The menu begins with the word File and continues with Edit, View, Insert, Format, Tools, Table, Window, and Help. You use the menu to give instructions to the software. Point with your mouse to the menu option and click the left mouse button to open a drop-down menu. You can now use the left and right arrow keys on your keyboard to move left and right across the Menu bar options. You can use the up and down arrow keys to move up and down the drop-down menu. To select an option, highlight the item on the drop-down menu and press Enter. An ellipse after a menu item signifies additional options; if you select that option, a dialog box will appear.
Exercise 1
Do the following exercise. It demonstrates using the Microsoft Word menu.
Toolbars
- Point to the word File on the Menu bar.
- Click your left mouse button.
- Press the right arrow key until Help is highlighted.
- Press the left arrow key until Format is highlighted.
- Press the down arrow key until Style is highlighted.
- Press the up arrow key until Paragraph is highlighted.
- Press Enter to select the Paragraph menu option.
- Point to Cancel and click the left mouse button to close the dialog box.
![]()
The Standard Toolbar
![]()
The Formatting Toolbar
Toolbars provide shortcuts to menu commands. Toolbars are generally located just below the Menu bar. Before proceeding with the lesson, make sure the Toolbars we will use -- Standard and Formatting -- are available. Follow these steps:
The Ruler
- Point to View on the Menu bar.
- Click the left mouse button.
- Press the down arrow key until Toolbars is highlighted.
- Press Enter.
- Standard and Formatting should have a checkmark next to them.
- If both Standard and Formatting have a checkmark next to them, press Esc three times to close the menu.
- If one or both do not have a checkmark, highlight Customize.
- Press Enter.
- Point to the box next to the unchecked word and click the left mouse button. A checkmark should appear.
Note: You turn the checkmark on and off by clicking the left mouse button.- Point to Close and click the left mouse button to close the dialog box.
![]()
The ruler is generally found below the main toolbars. The ruler is used to change the format of your document quickly. To display the ruler:
Document View
- Point to View on the Menu bar.
- Click your left mouse button.
- The option Ruler should have a checkmark next to it. If it has a checkmark next to it, press Esc twice to close the menu. If it does not have a checkmark next to it, continue to the next step.
- Press the down arrow key until Ruler is highlighted.
- Press the Enter key. The ruler should display below the toolbars.
With word, you can display your document in one of four views: Normal, Outline, Page Layout, or Online Layout.
Before moving ahead, check to make sure you are in Normal view:
- Normal view
- Normal view is the most often used and shows such formatting as line spacing, font, point size, and italics. Multiple-column text is displayed in one continuous column.
- Outline view
- Outline view displays the document in outline form. Headings can be displayed without the text. A heading can be moved and the accompanying text moved with it.
- Page Layout view
- The Page Layout view shows the document as it will look when it is printed.
- Online Layout view
- The Online Layout view optimizes the document for online viewing (viewing the document in a browser).
Text Area
- Point to View on the Menu bar.
- Click the left mouse button.
- The icon next to Normal should be depressed. If the icon next to normal is depressed, press Esc twice to close the menu. If the icon next to Normal is not depressed, continue on to the next step.
- Highlight Normal.
- Press Enter. You should now be in Normal view.
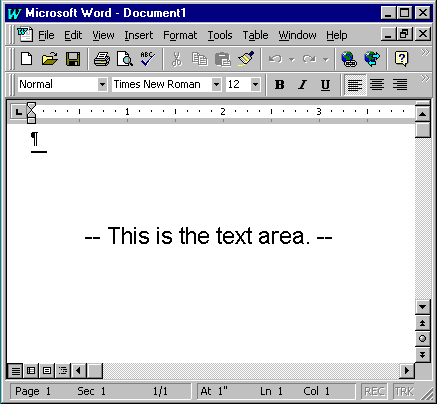
Just below the ruler is a large area called the "text area." You type your document in the text area. The blinking vertical line in the upper left corner of the text area is the cursor. It marks the insertion point. As you type, your work will show at the cursor location. The horizontal line next to the cursor marks the end of the document.
You have completed Lesson One. Typically you would save your work before exiting. This lesson did not require you to enter any information. Without text in the text area, there is nothing to save. To exit Word:
- Click on File.
- Highlight Exit, which can be found at the bottom of the drop-down menu.
- Press Enter.
- If you have entered text, you will be prompted: "Do you want to save changes to Document1?" To save your changes, click on Yes. Otherwise, click on No.
- Specify the correct folder in the Save In box.
- Name your file by typing lesson1.doc in the File Name field.
- Click on Save.
Lesson Two: Things You Need to Know
To begin, open Microsoft Word.
During the lessons that follow, you will be asked to "click on" items. When asked:
If you are asked to double-click on an item:
- Point to the item.
- Press the left mouse button.
Options
- Point to the item.
- Quickly press the left mouse button twice.
Following is an introduction to various features of the Microsoft Word screen.
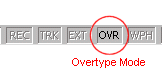
Status Bar
The Status bar appears at the very bottom of the screen and provides such information as the current page, current section, total number of pages, inches from the top of the page, current line number, and current column number. The Status bar also provides options that enable you to track changes or turn on the Record mode, the Extension mode, the Overtype mode, and/or WordPerfect help.
Horizontal and Vertical Scroll Bars
The Horizontal and Vertical scroll bars, if turned on, enable you to move up and down or across the window simply by pressing the icons located on the scroll bars. The Horizontal scroll bar is located above the Status bar. The Vertical scroll bar is located along the right side of the screen.
Nonprinting Characters
Certain characters do not print but do affect the document layout. You can elect to see these characters on the screen as you type or have them remain invisible. For these lessons, we will opt to see them onscreen. Here they are:

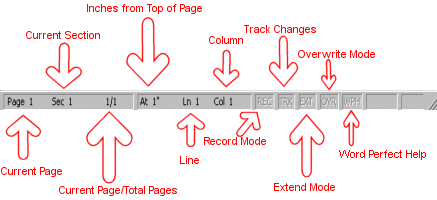
Denotes a tab Denotes a space Denotes the end of a paragraph Denotes hidden text Denotes a nonbreaking hyphen Recently Used File List
If you enable the recently used file list, clicking on File displays the most recently opened files near the bottom of the drop-down menu. You can click on the filename to quickly open the file.
Setting Options
Before proceeding, turn on the Status bar, Horizontal scroll bar, Vertical scroll bar, nonprinting characters, and the recently used file list. Follow the procedure outlined below:
Highlighting Text
- Click on Tools.
- Highlight Options.
- Press Enter.
- Click on the View tab.
- In the Window frame, check to see if there are checkmarks next to Status Bar, Horizontal Scroll Bar, and Vertical Scroll Bar.
- If there is no checkmark next to one or more of these items, go to the box next to the unchecked item(s) and click the left mouse button.
Note: You toggle the checkmark on and off by clicking the left mouse button.- In the Nonprinting Characters frame, check to see if there is a checkmark next to All.
- If there is no checkmark next to All, go to the box next to All and click the left mouse button. A checkmark should appear.
- Click on the General tab.
- Check to see if there is a checkmark next to the Recently Used File List. If there is no checkmark, go to the box next to Recently Used File List and click the left mouse button. Check to see if the number in the Entries box is at least four. If it is not, type 4 in the box.
- Check to see if Inches is selected in the Measurement Units box (this sets the unit of measurement for the ruler). If it is not, click on the pull-down menu and then click on Inches.
- Click on OK to close the dialog box.
Throughout these lessons you will be asked to highlight text. You can use either of the following methods:
Highlighting by Using the F8 and Arrow Keys
Highlighting by Using the Mouse
- Place the cursor before or after the text you wish to highlight and click the left mouse button.
- Press the F8 key, which will serve as an "anchor" showing where text you wish to highlight begins or ends.
- Press the appropriate arrow key (left arrow to move to the left, or right arrow to move to the right) until the text is highlighted. You can use the up or down arrow key to highlight one line at a time. Press Esc to remove the anchor.
Highlighting Menu Items
- Place the cursor before or after the text you wish to highlight.
- Hold down the left mouse button.
- Move the mouse left, right, up, or down until the text is highlighted.
Menu Bar
To select a Menu bar item:
Drop-Down Menu Items
- Click on the Menu bar item. A drop-down menu will appear.
- To change the Menu bar option selected, move the mouse pointer across the Menu bar while holding down the left mouse button.
Note: After you highlight an item on the Menu bar, you can also use the left and right arrow keys to move across the Menu bar.When you click on any option on the Menu bar, a drop-down menu will appear. To highlight a drop-down menu item:
Placing the Cursor
- Move up or down the drop-down menu while holding down the left mouse button.
- Press Enter to select a drop-down menu item.
Note: You can also use the arrow keys to move up and down the drop-down menu.During the lessons, you will often be asked to place the cursor at a specific location on the screen. You place the cursor by pointing to the location specified and pressing the left mouse button or by using the arrow keys to move to the specified location.
Choosing Menu Commands by Using the Alt Key
There are many methods to accomplish tasks using Microsoft Word. Generally, when selecting items from the menu, we will ask you to click on or highlight the menu item. However, you can also select a menu option by
Shortcut Key Demonstration
- Pressing the Alt key while typing the underlined letter on the Menu bar.
- Typing the letter underlined on a drop-down menu. If a dialog box appears, you can move around the dialog box by pressing the Alt key and any underlined option.
Shortcut Notations
- Hold down the Alt key and press "o" to select Format from the menu.
- Press "p" to select Paragraph from the drop-down menu.
- Hold down the Alt key and press "i" to select the Indents and Spacing tab.
- Hold down the Alt key and press "b" to select Before from the Spacing frame.
- Press Enter to close the dialog box.
A key name followed by a dash and a letter means to hold down the key while pressing the letter. For example, Alt-o means you should hold down the Alt key while pressing "o." A shorthand notation of the above demonstration would read as follows:
Typists who are slowed down by using a mouse usually prefer using keys.
- Press Alt-o, p.
- Press Alt-i.
- Press Alt-b.
- Press Enter.
When you type in Microsoft Word, you do not need to press a key to move to a new line as you do when typing with a typewriter. To start a new paragraph, press the Enter key.
You have completed this lesson. Typically you would save your work before exiting. This lesson does not require you to enter any text, so you might have nothing to save. To exit Microsoft Word:
Lesson Three: Microsoft Word Basic Features
- Click on File.
- Highlight Exit, which can be found at the bottom of the drop-down menu.
- Press Enter.
- If you have entered text, you will be prompted: "Do you want to save changes to Document1?" To save your changes, click on Yes. Otherwise, click on No.
- Specify the correct directory in the Save In box.
- Name your file by typing lesson2.doc in the File Name field.
- Click on Save.
This lesson covers typing, the Backspace key, the Delete key, inserting text, bolding, underlining, and italicizing. To begin this lesson, open Microsoft Word.
Typing and Using the Backspace Key
The exercises that follow will teach you how to enter and delete text. To enter text, simply type just as you would if you were using a typewriter. To capitalize, hold down the Shift key while typing the letter. Use the Backspace key to delete text. You do not need to press Enter to start a new line -- Microsoft Word automatically wraps at the end of the line. Press Enter the start a new paragraph.
Exercise 1
The Delete Key
- Type the following sentence:
Joe has a very large house.- Now delete the word "house." Using either the arrow keys or the mouse, place the cursor between the period and the "e" in the word "house."
- Press the Backspace key until the word "house" is deleted.
- Type boat. The sentence should now read:
"Joe has a very large boat."You can also delete text by using the Delete key. First, highlight the text you wish to delete; then press the Delete key.
Exercise 2
Delete the word "very" from the sentence you just typed.
Inserting Text
- Highlight the word "very."
- Place the cursor before the "v" in the word "very" and press the F8 key. Then press the right arrow key until the word "very" is highlighted.
- Press the Delete key. The sentence should now read:
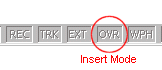
"Joe has a large boat."You can insert text. To insert text, you must be in the Insert mode. To check to see whether you are in the Insert mode, look at the Status bar, located at the very bottom of the screen. Look at the right side of the Status bar. If the letters "OVR" are gray, you are in the Insert mode. If the letters "OVR" are black, you are in the Overtype mode.
To change to the Insert mode:
Alternate Method -- Setting Options by Using the Menu
- Double click on the letters "OVR."
- The letters "OVR" should now be gray.
Alternate Method -- Setting Options by Using Keys
- Go to the Menu bar. Click on Tools.
- Highlight Options at the bottom of on the drop-down menu. Press Enter.
- Click on the Edit tab.
- The Overtype Mode box should be blank. If the box is blank, click on OK.
- If the Overtype Mode box is not blank, click on the box to remove the checkmark. Then click on OK.
Exercise 3
- Press Alt-t, o.
- Click on Edit.
- Press Alt-o (toggles between overtype and insert).
- Press Enter.
Make sure the letters "OVR" are gray before proceeding. You are going to insert the word "blue" between the words "large" and "boat."
Overtype
- Place the cursor between the words "large" and "boat."
- Type the word blue.
- The sentence should now read:
"Joe has a large blue boat."You can type over the current text (replace the current text with new text). However, you must be in the Overtype mode. Do the following to change to the Overtype mode.
Make sure the letters "OVR" are black before proceeding to the following exercise.
- Double-click on "OVR" on the Status bar.
- The letters "OVR" should now be black.
Exercise 4
Change the word "blue" to "gray."
Bold, Underline, and Italicize
- Place the cursor before the letter "b" in "blue."
- Type the word gray.
- The sentence should now read:
"Joe has a large gray boat."You can bold, underline, or italicize when using Word. You also can combine these features -- in other words -- you can bold, underline, and italicize a single piece of text.
In the exercise that follows, you will learn three different methods for bolding, italicizing, or underlining when using Word. You will learn to bold, italicize, or underline by using the menu, an icon, or the keys.
Exercise 5
Type the following exactly as shown. Remember, pressing the Enter key starts a new paragraph. Press the Enter key at the end of each of the following lines to start a new paragraph.
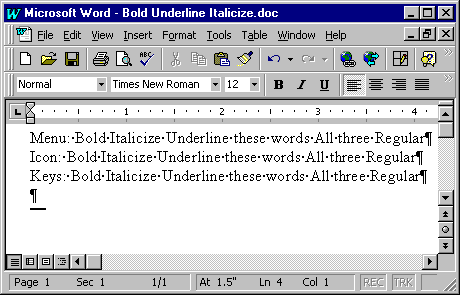
Menu: Bold Italicize Underline these words All three Regular
Icon: Bold Italicize Underline these words All three Regular
Keys: Bold Italicize Underline these words All three Regular
Your screen should look similar to the one shown above.Bold - Using the Menu
Alternate Method -- Bold by Using an Icon
- On the line that begins with Menu, first highlight the word Bold. To do so, place the cursor before the letter "B" in "Bold." Press the F8 key; then press the right arrow key until the entire word is highlighted.
- Click on Format.
- Highlight Font. Press Enter.
- Click on Bold in the Font Style box.
Note: You can see the effect of your selection in the Preview window. To turn off the bold, click on Regular.- Click on OK to close the dialog box.
- Click anywhere in the text area to remove the highlighting.
Alternate Method -- Bold by Using the Keys
- On the line that begins with "Icon," first highlight the word "Bold." To do so, place the cursor before the letter "B" in "Bold." Press the F8 key; then press the right arrow key until the entire word is highlighted.
- Click on the Bold icon
on the toolbar.
Note: To turn off bold, highlight the text and press the Bold icon.- Click anywhere in the Text area to remove the highlighting.
Italicize - Using the Menu
- On the line that begins with "Keys," first highlight the word "Bold." To do so, place the cursor before the letter "B" in "Bold." Press the F8 key; then, press the right arrow key until the entire word is highlighted.
- Press Ctrl-b (hold down the Ctrl key while pressing b).
Note: To turn off Bold, press Ctrl-b again. You can also remove formatting by pressing Ctrl-spacebar.- Click anywhere in the Text area to remove the highlighting.
Alternate Method -- Italicize by Using an Icon
- On the line that begins with "Menu," first highlight the word "Italicize." To do so, place the cursor before the letter "I" in "Italicize." Press the F8 key; then press the right arrow key until the entire word is highlighted.
- Click on Format.
- Highlight Font. Press Enter.
- Click on Italic in the Font Style box.
Note: You can see the effect of your selection in the Preview window. To turn off the italics, click on Regular.- Click on OK to close the dialog box.
- Click anywhere in the Text area to remove the highlighting.
Alternate Method -- Italicize Using Keys
- On the line that begins with "Icon," first highlight the word "Italicize." To do so, place the cursor before the letter "I" in "Italicize." Press the F8 key; then press the right arrow key until the entire word is highlighted.
- Click on the Italic icon
on the toolbar.
Note: To turn off italics, highlight the text and press the Italic icon.- Click anywhere in the Text area to remove the highlighting.
Underline - Using the Menu
- On the line that begins with "Keys," highlight the word "Italicize." Place the cursor before the letter "I" in "Italicize." Press the F8 key; then, press the right arrow key until the entire word is highlighted.
- Press Ctrl-i (hold down the Ctrl key while pressing i).
Note: To toggle Italic off, press Ctrl-i again. You can also remove formatting by pressing Ctrl-spacebar.- Click anywhere in the Text area to remove the highlighting.
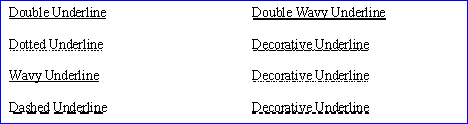
You can underline when using Word. The following types of underlines are available if you use the menu:
The following illustrates underlining using the menu:
Alternate Method -- Underline by Using the Icon
- On the line that begins with "Menu," first highlight the words "Underline these words." To do so, place the cursor before the letter "U" in "Underline." Press the F8 key; then press the right arrow key until all the words are highlighted.
- Click on Format.
- Highlight Font.
- Press Enter.
- In the Underline box, click to open the pull-down menu. Click on the type of underline you wish to use.
Note: To remove an underline, select None from the pull-down menu.- Click on OK to close the dialog box.
- Click anywhere in the Text area to remove the highlighting.
Alternate Method -- Underline by Using the Keys
- On the line that begins with "Icon," first highlight the words "Underline these words." To do so, place the cursor before the letter "U" in "Underline." Press the F8 key; then press the right arrow key until all the words are highlighted.
- Click on the Underline icon
on the toolbar. You will get a single underline.
Note: To turn off underlining, press the Underline icon again.- Click anywhere in the Text area to remove the highlighting.
All Three - Using the Menu
- On the line that begins with "Keys," first highlight the words "Underline these words." To do so, place the cursor before the letter "U" in "Underline." Press the F8 key; then, press the right arrow key until all the words are highlighted.
- Press Ctrl-u (hold down the Ctrl key while pressing u). You will get a single underline.
Note: To turn off underlining, press Ctrl-u again.- Click anywhere in the Text area to remove the highlighting.
Alternate Method -- All Three by Using Icons
- On the line that begins with "Menu," first highlight the words "All three." To do so, place the cursor before the letter "A" in "All." Press the F8 key; then press the right arrow key until all the words are highlighted.
- Click on Format.
- Highlight Font. Press Enter.
- In the Font Style box, click on Bold Italic.
Note: You can see the effect of your selection in the preview window. To turn off the Bold Italic, click on Regular.
In the Underline box, click to open the pull-down menu. Click on the type of underline you want to use.
Note: To remove an underline, select None from the pull-down menu.- Click on OK to close the dialog box.
- Click anywhere in the Text area to remove the highlighting.
Alternate Method -- All Three by Using the Keys
- On the line that begins with "Icon," first highlight the words "All three." To do so, place the cursor before the letter "A" in "All." Press the F8 key; then press the right arrow key until all the words are highlighted.
- Click on the Bold icon on the toolbar.
- Click on the Italic icon on the toolbar.
- Click on the Underline icon on the toolbar.
- Click anywhere in the Text area to remove the highlighting.
Save File
- On the line that begins with "Keys," first highlight the words "All three." To do so, place the cursor before the letter "A" in "All." Press the F8 key; then, press the right arrow key until all the words are highlighted.
- Press Ctrl-b (bold).
- Press Ctrl-i (italicize).
- Press Ctrl-u (underline).
Note: You can remove formatting by highlighting the text and pressing Ctrl-spacebar.- Click anywhere in the Text area to remove the highlighting.
You must save your files if you wish to recall them later. Before you can save, you must give your file a name. To save your file and close Word, follow the instructions below:
- Click on File.
- Highlight Save As. Press Enter.
- Specify the correct folder in the Save In box.
- Name your file by typing lesson3.doc in the File Name box.
- Click on Save.
- Click on File.
- Highlight Exit. Press Enter.
Introduction to Windows
Microsoft Windows: An Introduction
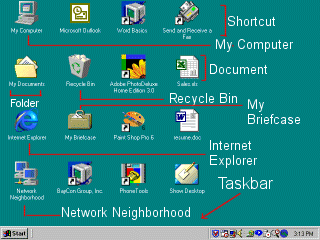
Taskbar By default, the taskbar is located on the bottom edge of the desktop. You can click on the taskbar and drag it to other locations. The Start button, active program buttons, icons for quick access to programs, and the current time are located on the taskbar. My Computer The My Computer icon provides access to the resources on your computer. You can access your drives and other peripherals by clicking on the My Computer icon. You can also access the Control Panel through My Computer. Internet Explorer The Internet Explorer icon launches the Internet Explorer browser. Network Neighborhood If you are working on a network, Network Neighborhood displays all of the computers on the network. The Recycle Bin When you delete an object, Windows 98 sends it to the Recycle Bin. You can restore objects that are located in the Recycle Bin or you can permanently delete them. Shortcut icon Icons with an arrow in the lower left corner are shortcut icons. Click on the icon for quick access to the object they represent (program, document, printer, and so on). Program, Folder, and Document icons Program, folder, and document icons do not have an arrow in the lower left corner. They represent the actual object and provide direct access to the object. Introduction to WebBoard
WebBoard the system in which you, the student, will log on participate and complete online educational activities via the Internet. WebBoard is extremely flexible and convenient to use and manage. You can use it anywhere, any time, through a browser or email program. All you need is access to the Internet or an intranet. When you log on in the e-learning delivery system you will be prompted for a user identification and password which will be assigned to you by Westley-Davis. Once you log on, you will be able to access the courses that you are currently enrolled in, for example: Computer Literacy or Medical Coding. Make sure that you read the announcements from the School Admin Board for additional instructions. This is first Board or Screen that you will see when you log into WebBoard. To log in to WebBoard you will select the Virtual School option from the Westley-Davis home page. You will then select the option for WebBoard students. You may also access WebBoard by clicking on the following: click here for WebBoard.

Quick Access Links
![]()